My UGLY Travel Trailer Makeover on the Cheap
- Oct 29, 2024
- 9 min read
✨Hello thrifties! Welcome or welcome back! I'm Maria and I'm addicted to all things thrifted, cheap, and vintage! I love the hunt and the finds, some of which I sell on Mercari, while others I keep for myself and use to decorate my home. Sometimes I leave them as they are, and other times I reinvent them by giving them new life through a new unexpected use or a makeover. BUT my need to be artistic isn't just limited to home decor, as I flipped a house and a camper (after living in and/or using it, of course!). Let's take a walk back in time to my very first travel trailer bought on impulse and how I not only transformed but also sold "her" several years later for the same amount.
Like mentioned previously, she was an impulsive purchase. I visited a good friend who had a permanent campsite at the bay and thought I too would love the lifestyle of having a home away from home. Although I ultimately did not purchase a site and instead decided to transient camp, we got five good years of traveling with our old 1995 Prowler. It was love at first sight, and she was the one and only travel trailer we looked at. I saw past her faded exterior and dated interior, instead envisioning making memories with my granddaughter (my only grandchild at the time), and that we did! We camped twice a month for half the year, but it wasn't all peaches and cream. The Prowler had problems, lots of them, that I hadn't even considered, so if you do plan on buying an RV of any sort, DO YOUR HOMEWORK. They need regular maintenance and upkeep, and even with the best of care, can develop leaks and other issues. We experienced it all... 'nuff said, as I still have PTSD from early camping trips with no heat or hot water and water dripping on my head!!

Of course, fixing those issues came first, and there were many times I wanted to just abandon her somewhere. But Thrifty M (my granddaughter) LOVED her, and I loved all the special times we had camping together, so I continued on💗
Let me start by saying that every aesthetic choice I made was for my own enjoyment, not for future resale. I waited a good two years before starting the remodeling process on this trailer, allowing me to truly understand the areas that needed improvement and how to enhance functionality and storage. Despite the trailer sleeping 8 people quite snugly, with a double bed, a sofa that was a bit too short, a convertible banquette table, and two bunks all crammed into a space of 28' x 9' with no slides, I must admit that the storage solutions were surprisingly ample and cleverly designed with hidden compartments throughout.
After purchasing, I immediately started the hunt for the essentials. All my pots, pans, coffee maker, crockpot, and utensils, etc. - were thrifted in about a week's time. Even my dish strainer and dish towels were thrifted. Many of my Tupperware pieces and larger serving utensils were found in free bins. My outdoor tablecloth and even the table weights, again thrifted. I did shop at numerous stores and yard sales in that week's time, but since I was looking for basics, they were pretty easy to find on the cheap. The only things I purchased new were my Corelle dishes (a must for an RV since they are literally unbreakable) and my small air fryer, also a MUST! I found old yoga mats in the bins, sanitized, and cut to size as drawer and cabinet liners. They helped keep everything stable when moving. To act as insulation under the beds, I used a combination of yoga mats and used play floor tiles. Not only do they grip your mattress in place but keep things cozy in the colder months.
BEFORE: Lots of ugly and outdated finishes. These are photos taken the day of sale.


⭐PRO TIP: Think outside the box when looking for creative uses for otherwise discarded items. Consider what the items are made of and how they can be used in other ways, such as I did using yoga mats as insulation and liners.
My first exciting step in the remodeling process was to transform everything with a fresh coat of paint! The faux wood paneled fridge got a fun makeover into a chalkboard, the old wallpapered walls were revamped into a bright white canvas with a stylish teal accent wall, and the outdated shiny 80's gold trim was bid farewell. Since I wanted to work within my expertise with paint and also consider safety and weight distribution, I decided to keep all the existing built-in furniture intact.

The oak cabinets with faux stained glass mirrored insets caught me off guard, they reminded me of a 1980s waterbed. I decided to take a risk by painting over them after removing the faux glass leading. I followed a specific process: cleaning them with Krud Kutter, applying three coats of a mold and mildew-resistant primer, and then using Annie Sloan Chalk paint. However, I soon realized that the chalk paint was not cost-effective, so I switched to having the old white color matched in Zinsser permawhite, which turned out to be indistinguishable. Since the oak finish had a slight gloss, I lightly sanded all the cabinetry, paying extra attention to the cabinet fronts, which were not real wood like the doors. I may have applied an excessive number of coats, with three coats of paint over the three coats of primer, but I wanted to ensure durability due to the extreme temperature changes and different materials I was working with. To finish, I added two coats of polyacrylic. My general rule is to use polyacrylic for painted surfaces and polyurethane for stained surfaces as polyurethane tends to yellow. The end result was so convincing that the painted mirror inserts looked like a solid recessed wooden cabinet doors. No one but us even knew!
AFTER: Same mirrored doors, just painted. You can't even tell!


The fridge was primed and painted with chalkboard paint my boss gave me left over from a project. I also did three coats. Be sure to "prime" your board before using, by taking chalk and heavily coating all over and wiping off, or it will be hard to get the chalk off if you don't.
All the hardware and hinges received a thorough cleaning with Krud Kutter before being spray-painted silver. The wall behind the jackknife sofa got a vibrant teal paint makeover, while the recessed storage was painted blue and adorned with Dollar Tree baskets. The stove top, originally white, now sports a sleek black finish to match the oven's front, thanks to a heat-resistant spray paint. I even transformed some of the yellow plastic covers by giving them a fresh coat of white spray paint. The simple act of painting everything made a remarkable difference!
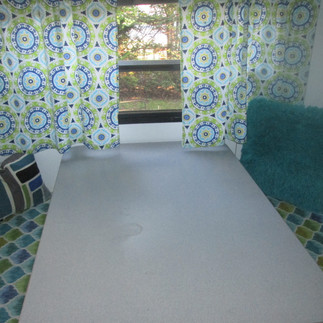
Next I had to address the "unique" velour fabric and outdated valances. Instead of purchasing expensive custom slipcovers from Etsy, I searched for a more budget-friendly solution. By browsing Craigslist, I found a skilled seamstress in the services section who used to create theater costumes. She offered affordable services, so I provided the outdoor fabric I found on sale and she crafted custom slipcovers for both the banquette and the jackknife sofa, which I choose an inexpensive faux suede. Disassembling the sofa was necessary for her to create a pattern. Despite the option to remove and wash the sofa slipcovers, we opted not to do so due to the disassembly required. The total cost, including fabric and sewing services, came in just under $100. I found the long zippers in a thrift store for 10 cents each, in a lilac color. Although not a color that matched, the fact that she sewed them in as hidden zippers saved me from purchasing expensive new ones in the proper color.
AFTER: New custom slip covers and curtains really bring life into this space.


⭐PRO TIP: Need large zippers for a project? Go to the bins and source clothing, large canvas bags, and sleeping bags with longer zippers. Not only will you save money, but you're reusing something destined for the trash.
To make the front of the jackknife sofa look "finished," I thrifted a green bed skirt, cut it to size, and stapled it into place under the cushions, adding a center pleat for interest.

Before, there was a plastic accordion-style door dividing the kitchen from the bunk area. It wouldn't stay open or closed, so I took it down and replaced it with two curtain panels hung on a tension rod. I also purchased two more curtain panels for the living spaces, cutting them to size and hand-stitching smaller curtains for the rest of the living space. Additionally, I wrapped the valances in the matching leftover fabric.

To create a vibrant and lively atmosphere in the bedroom, I decided to get creative with the decor. I found some fantastic geometric fabric on clearance that perfectly complemented the colors in the living area. With this fabric, I hand-stitched my own curtains, added valances, and embellished them with ribbon details. To complete the look, I sourced all the bedding from yard sales and thrift stores. My luck peaked when I stumbled upon a pair of perfectly coordinating pillows for just $1! It felt like hitting the jackpot and brought such a sense of joy and accomplishment to the room.


AFTER: Our bedroom with the new fabric and thrifted linens.
After completing the main projects, it was time to enhance the space with some style and functionality! Here are a few updates I made in the kitchen area:
⚡ I opted for affordable peel-and-stick tiles for the backsplash, in hindsight I would have added Gorilla glue during installation as I did need to reglue a few due to extreme temperature fluctuations.
⚡ I installed office file organizers, replacing the magnetic backs with command strips for convenient access to cooking essentials.
⚡I Managed to find a new stove cover on Craigslist, providing extra counter space at a great price of $40, just like the one here.
AFTER: Kitchen area


The various decor pieces were thrifted, as well as the rugs and pillows. I only purchased a new shower curtain and towels from Dollar General. The teal fuzzy pillow was found in a free bin and just needed a quick repair and wash. I never imagined I would find a clock that matched my curtain pattern in the bins, but I did! It never held time properly, which is why it was probably donated, but I didn't care. Any place I could, I added hooks and baskets to keep things accessible, but also lightweight. My spice rack was a cool tray I found, added command strips to the back, and bought little magnetic spice containers. Two of the projects I never got to were adding contact paper to the countertop and table, as well as decorating the bunk area. Because my granddaughter was little, I did add a short tension shower rod to the end of her bunk and added a sweater organizer so she had a place for her clothes. In our bedroom closet and pantry, I cut a thrifted cloth shoe organizer and stapled it to the back of the doors and around the base of my bed. I did the same thing in the linen closet to hold cleaners and tools. The floor was newly replaced before we bought it, so it stayed, and I added a runner rug for warmth and a pop of color.
AFTER: Different storage solutions, all thrifted!


In the bathroom, I changed the shower curtain, added a thrifted rug, and installed a rail and bucket system to hold personal items. I also painted the walls, door, and cabinetry.
I was determined to find art that truly spoke to me, something that carried deep meaning. When I stumbled upon this particular saying, it instantly resonated with me. It encapsulated everything that the camper symbolized in my life - a haven of joy and treasured memories. Despite the chaos of kids, toys, and camping gear, those moments were truly the highlight of my existence, memories I will hold dear forever.

One day, I stumbled upon an unattractive painting at a yard sale priced at just $0.75. I saw its potential as a canvas for something special. With a stroke of creativity, I decided to paint over it with chalkboard paint. To bring my vision to life, I enlisted the help of a talented local calligraphy artist I found on Facebook. For a reasonable fee of $25, she beautifully painted the camper and the meaningful saying in chalk before sealing it. The total cost of this unique artwork came to $25.75.
The wooden frame with its charming scalloped edge perfectly complemented the piece. Placed above the jackknife sofa, the artwork found its ideal spot, adding a touch of personal flair to the space.

When remodeling my camper, I had to balance staying on budget with making sure everything would be secure while mobile and not adding too much weight. Working with unfamiliar surfaces was challenging, but I learned that with the proper prep and products, anything can be painted. We used the camper hard, and it still looked as good as the day I finished it, proving that all the extra coats of paint were worth it.
From start to finish, it took me about six weeks. While I had big plans to paint the exterior, ultimately, as my family grew, so did our need for a bigger camper. The day I listed her, I literally had hundreds of inquiries, many from out of state. She sold in two days at the same price I paid for her five years earlier to someone who drove 2 hours to buy her and affectionately named her after my granddaughter - who cried when she got hauled away. Of course, the custom painting stayed with me, and since 2019 has proudly adorned our new trailer.
It is with a heavy heart that I write this blog post to say that we have decided to close the camping chapter of our lives. Camping just isn't as much fun without our grandchildren. However, writing this blog post has brought back a flood of happy memories that I will cherish forever.

Have you ever traveled in an RV or want to? Please tell me about your adventures and favorite east coast campgrounds below👇
As an Amazon Associate I earn from qualifying purchases


Comments