Past Thrift Flips (Part 1)
- Jul 16, 2024
- 5 min read
Updated: Sep 25, 2024
Hi folks! As many of you know, I love sourcing and decorating with vintage items. What you may not know is that I also love to refurbish furniture. My furniture-painting journey started way back in 1997 when I was pregnant with my daughter. I was a new homeowner with little money, and my dad offered me a midcentury modern dresser that belonged to my mom when she was a kid. It was made of that funky blond wood that everyone wants to achieve these days, but back then, I wanted to cover up the wood grain. I broke out a can of white paint, and the rest is history! I wish I had a picture of that dresser, paint runs and all, because it would show that I learned a lot about what not to do from that project. Who knew that that dresser would be the beginning of my ❤️ affair with painting furniture .
I know painting wood finishes, especially vintage or antique pieces, is very controversial. However, the likelihood is that you don't own a priceless antique that would be absolutely ruined with paint. My philosophy is that you should do whatever you need to do to make your furniture and home your own. Whether that's with paint, decoupage, fabric, or anything else, it's yours to love.
These pictures aren’t great,as I took them around 2014-2018 as a way to remember what my furniture looked like before and after. I hope you find them inspiring. Except for the Ikea chair, they were all sourced second hand and transformed to my liking.
The Freecycle Vanity
You saw a glimpse of this before in my boho room makeover, and if you didn't, click here to see that room makeover. This was my first Freecycle score. Originally, it was stained wood, with lots of scratches and no center surface. My boyfriend added particleboard to the center for more surface room. The first time I painted it all white for my daughter, who used it from the age of 7 until she was 18. Trust me when I say it saw a lot of abuse when it finally came back to me! I transformed this piece with a homemade chalk recipe mixture combining several colors until I created a hue I liked. The top had some damage from spilled nail polish remover, so I painted it two shades of brown, used a chip brush to add some gel stain, then applied poly over it. You'd never know it's a faux stain effect! Then crystal knobs came from Amazon. My total investment is the poly, knobs, and particleboard as the paint and stain were leftovers from other projects.


The Wing Back Chair
When chalk painting became all the rage I was in a facebook group where you could showcase your work. A woman named Sandy, who I actually knew personally, posted a similiar chair that she painted and I was so inspired that I had to do my own. Before I never considered painting fabric with chalk paint. The chair was $35 from a local thrift store, and the paint was leftover wall paint that I mixed to make my own chalk paint. The key to painting fabric is to have a water bottle handy and spray, spray, spray! You want the fabric to be wet as you paint. It did require 2 coats, sanding in between with a nubby piece of fabric, but turned out better than expected. It had the feel of suede, wasn't crunchy or hard, and didn't color transfer the entire 8 years I owned it. I ended up selling it to a photograher on Marketplace for $75, after getting many years of practical use from it.


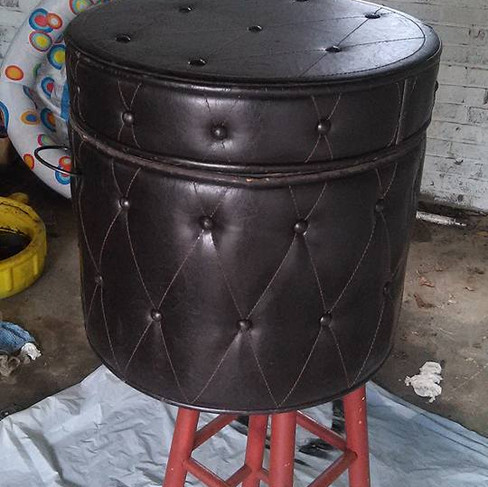
The Barrel Storage Ottoman
This thing was in a free pile, as it definately saw better days. But the bones were good and was exactly what I was looking for as a vanity chair. The storage was an added bonus! This one was less than $10 to flip as all I did was get automotive interior spray paint from a parts store and staple some faux fur fabric remenant to the top. I used it for a few years before I found the ottaman I have now, and passed it along in a free group so it could continue to live on!


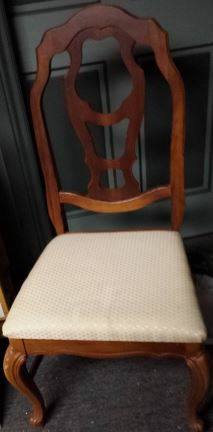
The Dining Chairs
The table (not shown) and chair set was an early Craigslist score. When I went to pick them up it turned out it was from the estate of the mother of a local well known artist, who lived in a very grand mansion. He gave me a tour ( I ❤️old homes!) and I was in awe!. I paid $100 for the entire French Provincial dining set. This was my first ever time using chalk paint and I took the chair to a class as my "project". I had already purchased the (NOT thrifted fabric) beforehand and stapled over the existing. It turned out so well the "teacher" staged them and used the photo (right) on her website to promote the class. This was done in Annie Sloan Old White, which is expensive. Since than I've learned ways to make my own chalk paint. While the high end fabric made this a not so friendly to the budget project, the fact that I scored the set for cheap, made the fabric splurge obtainable.


Ikea Chair
This originally pink plastic chair was my daughter's for her vanity. When she moved out, I knew I wanted to transform it. I still had some faux fur remnant fabric left over from the storage ottoman, and it was just enough to glue to the chair using E-2000 glue. First, I spray painted the base and casters to a polished gold finish for some bling. This was back in 2016 before gold was even in style! I just passed it along last year on Marketplace, and had lots of interest. I think Ikea products are some of the most transformable pieces due to their simplistic nature. Just Google Ikea flips and you'll see tons of inspirational transformations!


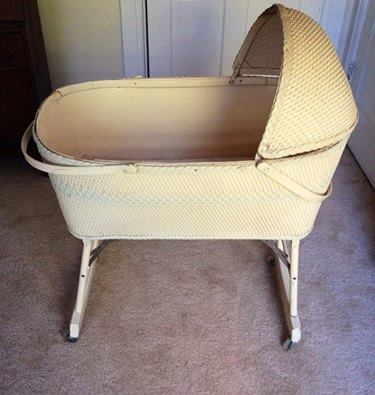
The Bassinet
When my first grandbaby was born in 2014 I was given free reign to design, source, and decorate her nursery. It was a dream come true! Baby mama wanted a hot pink/black theme that was a little on the edgier side, so that was my foundation. I sourced Marketplace for weeks, driving many miles sourcing the furniture basics in black as I wanted them to have original, child safe finishes. The bassinet however, was more of a prop for the shower, and although functional, was used very little. I sold this for triple my initial investment a few months later. I started by cleaning, than spray painting the wicker. The interior was decoupaged in this fun wrapping paper, than I added the hot pink trim. Fortunately, the still in plastic mattress was found in a yard sale free pile as I took a chance that it would fit, and it was perfect! Total cost for bassinette with supplies all in was less than $20!


Thank you for following along and allowing me to hopefully inspire you to get creative with your pieces that are lacking some love. Just remember, it's only paint! If you don't like it, try again.
I'm always looking for new, inventive ideas and draw so much inspiration from others. Tell me all about your transformations!


Comments